Docker を支える Linux カーネル機能 Network Namespace から docker exec の実装が ip netns exec である雰囲気をつかむ

f:id:kyagi:20180216163134p:plain

Linux の Network Namespace を ip netns exec で操作しているうちに「docker exec の正体」がなんとなく見えてきた。

Bridge Networking Deep Dive — Docker Kubernetes Lab 0.1 documentation

デフォルトでは docker はコンテナの Network Namespace を見せないようにしている。これは docker exec からのみコンテナの Network Namespace にアクセスを許可するように意図しているものに感じられる。OOP でクラスのメンバを private や protected で保護することと似ているかもしれない。

$ docker run --rm -d --name b1 busybox sh -c "while true; do sleep 3600; done"
$ docker ps
CONTAINER ID        IMAGE               COMMAND                  CREATED             STATUS              PORTS               NAMES
0e3030605661        busybox             "sh -c 'while true..."   About an hour ago   Up About an hour                        b1

いつも操作を忘れてしまうので、シェル関数を作っておく。docker-netns show [CONTAINER-NAME] で ip netns 経由で exec できるようになる。隠蔽された状態に戻したい時は docker-netns stash [CONTAINER-NAME] を実行する。

function docker-netns () {
  local action=$1
  local cname=$2

  case ${action} in
    show)
      docker inspect ${cname} | jq ".[].State.Pid" | xargs -i sudo ln -s /proc/{}/ns/net /var/run/netns/${cname}
      echo "Network namespace for container ${cname} is visible now."
      ;;
    stash)
      sudo rm /var/run/netns/${cname}
      echo "Network namespace for container ${cname} is invisible now."
      ;;
    *) :
      ;;
  esac

  ls -l /var/run/netns/${cname}
}
$ sudo ip netns list
$

$ docker-netns show b1
Network namespace for container b1 is visible now.
lrwxrwxrwx 1 root root 18 Jan 31 00:30 /var/run/netns/b1 -> /proc/11385/ns/net

$ sudo ip netns list
b1

$ sudo ip netns exec b1 ip a # 以下 docker exec と内容が同じ
1: lo: <LOOPBACK,UP,LOWER_UP> mtu 65536 qdisc noqueue state UNKNOWN group default
    link/loopback 00:00:00:00:00:00 brd 00:00:00:00:00:00
    inet 127.0.0.1/8 scope host lo
       valid_lft forever preferred_lft forever
91: eth0: <BROADCAST,MULTICAST,UP,LOWER_UP> mtu 1500 qdisc noqueue state UP group default
    link/ether 02:42:ac:11:00:02 brd ff:ff:ff:ff:ff:ff
    inet 172.17.0.2/16 scope global eth0
       valid_lft forever preferred_lft forever

$ docker exec -it b1 ip a
1: lo: <LOOPBACK,UP,LOWER_UP> mtu 65536 qdisc noqueue
    link/loopback 00:00:00:00:00:00 brd 00:00:00:00:00:00
    inet 127.0.0.1/8 scope host lo
       valid_lft forever preferred_lft forever
91: eth0: <BROADCAST,MULTICAST,UP,LOWER_UP> mtu 1500 qdisc noqueue
    link/ether 02:42:ac:11:00:02 brd ff:ff:ff:ff:ff:ff
    inet 172.17.0.2/16 scope global eth0
       valid_lft forever preferred_lft forever

$ docker-netns stash b1
Network namespace for container b1 is invisible now.
ls: cannot access /var/run/netns/b1: No such file or directory

$ sudo ip netns list
$ 

$ sudo ip netns exec b1 ip route
Cannot open network namespace "b1": No such file or directory

ただ ip netns exec b1 ip a でなく ip netns exec b1 hostname だとコンテナのホスト名 0e3030605661 は返ってこずに docker host のホスト名が返ってくるので、あくまでネットワークに限定した名前空間である感覚がしている。その意味では docker exec は Network Namespace だけでなく Process Namespace やその他の名前空間をまとめて隔離した空間に対するインターフェイスなのではないか。

ip netns exec が docker exec の正体というのはただの個人的感覚でしかない。今度、知り合いのカーネルハッカーに聞いてみよう...。自分でソースを読めと言われるに決まっているのだけれど。ただこういった局所的な興味からカーネルソースに飛び込んでみるのも目的がはっきりしていていいかもしれない。(´▽`)

Disjunction と Either の違い

Safari Books Online で検索したところ、以下の記述が見つかった。

Disjunction is conceptually similar to Either, which can be used to represent one of two possible types. Disjunction is different from Either because its operations are right-biased. (6. Concurrency in Scala, Scala High Performance Programming)

scala の API ドキュメントでも Either の「Left を例外処理、Right を正常処理」は慣習的な取り決めのように読み取れる。

Convention dictates that Left is used for failure and Right is used for success. Scala Standard Library 2.12.0 - scala.util.Either

上記から、個人的に以下のような理解をしている。

  • Disjunction はもともと Right を正常値とするように設計されている。
  • Either は convention として慣習的に Right を正常処理とするように使われている(ことが多い)。

※会社の Scala エキスパートによると「2.12からEitherもright-biasedなので古い本は窓から投げ捨てて下さい」だそうだ。(^_^;

docker-machine で aws に docker 環境(docker host) を構築する

f:id:kyagi:20180216163134p:plain

いままでメインの docker 環境は AWS EC2 上で curl -fsSL get.docker.com -o get-docker.sh && sudo sh get-docker.sh のように構築していたけれど、 docker-machine for AWS を使ったほうがいろいろ便利だった。

Amazon Web Services (AWS) EC2 example | Docker Documentation

docker-machine for aws のいいところ

  • 自分で docker をインストールする必要がなく最新のバージョンを入れてくれる(docker インストール済の ec2 をたちあげてくれる)
  • aws でつくると docker-machine stop|start で ec2 も stop|start できる。
  • docker-machine provision で環境をリセットできる(docker と certs の再インストールを行ってくれる。バージョンアップ時に役立つ?)
  • ec2 インスタンスと Key Pairs が自動的に作成されるが、docker-machine rm で ec2 を削除すると Key Pairs も自動的に削除してくれる。

ただ provisioner として chef やその他をフックすることはできないようで、好みの docker 環境を何台も docker-machine create する場合は、あらかじめカスタム AMI を作っておいたほうがよさそうだ。

前提条件

  • docker-machine 操作元となる Mac もしくは Linuxに docker と docker-machine がインストールされていること
  • .aws/credentials に認証情報が設定されていること

環境構築

os は ubuntu 16.04 になる。この場合 docker.aws.net という ec2 インスタンスと Key Pairs が自動的に作成される。インスタンスタイプはデフォルトで t2.micro で OS は ubuntu 16.04)。

$ docker-machine create --driver amazonec2 --amazonec2-region ap-northeast-1 --amazonec2-zone b --amazonec2-vpc-id vpc-abcde123 --amazonec2-subnet-id subnet-abcde123 docker.aws.net
$ docker-machine ls
NAME               ACTIVE   DRIVER       STATE     URL                         SWARM   DOCKER        ERRORS
docker.mac.local   -        virtualbox   Running   tcp://192.168.99.102:2376           v18.01.0-ce
docker.aws.net   -        amazonec2    Running   tcp://aaa.bbb.ccc.ddd:2376           v18.01.0-ce

ログイン

$ docker-machine ssh docker.aws.net
Welcome to Ubuntu 16.04.2 LTS (GNU/Linux 4.4.0-1020-aws x86_64)

 * Documentation:  https://help.ubuntu.com
 * Management:     https://landscape.canonical.com
 * Support:        https://ubuntu.com/advantage

  Get cloud support with Ubuntu Advantage Cloud Guest:
    http://www.ubuntu.com/business/services/cloud

145 packages can be updated.
63 updates are security updates.


Last login: Mon Jan 29 17:31:26 2018 from xxx.xxx.xxx.xxx

ubuntu@docker:~$ cat /etc/os-release
NAME="Ubuntu"
VERSION="16.04.2 LTS (Xenial Xerus)"
ID=ubuntu
ID_LIKE=debian
PRETTY_NAME="Ubuntu 16.04.2 LTS"
VERSION_ID="16.04"
HOME_URL="http://www.ubuntu.com/"
SUPPORT_URL="http://help.ubuntu.com/"
BUG_REPORT_URL="http://bugs.launchpad.net/ubuntu/"
VERSION_CODENAME=xenial
UBUNTU_CODENAME=xenial

おまけ

mac のローカルで docker-machine を使って virtualbox で docker 環境を構築すると os は boot2docker になる。(ฅΦωΦ)ฅ

$ docker-machine create --driver virtualbox docker.mac.local
$ docker-machine ssh docker.mac.local
                        ##         .
                  ## ## ##        ==
               ## ## ## ## ##    ===
           /"""""""""""""""""\___/ ===
      ~~~ {~~ ~~~~ ~~~ ~~~~ ~~~ ~ /  ===- ~~~
           \______ o           __/
             \    \         __/
              \____\_______/
 _                 _   ____     _            _
| |__   ___   ___ | |_|___ \ __| | ___   ___| | _____ _ __
| '_ \ / _ \ / _ \| __| __) / _` |/ _ \ / __| |/ / _ \ '__|
| |_) | (_) | (_) | |_ / __/ (_| | (_) | (__|   <  __/ |
|_.__/ \___/ \___/ \__|_____\__,_|\___/ \___|_|\_\___|_|
Boot2Docker version 18.01.0-ce, build HEAD : 0bb7bbd - Thu Jan 11 16:32:39 UTC 2018
Docker version 18.01.0-ce, build 03596f5

docker@docker:~$ cat /etc/os-release
NAME=Boot2Docker
VERSION=18.01.0-ce
ID=boot2docker
ID_LIKE=tcl
VERSION_ID=18.01.0-ce
PRETTY_NAME="Boot2Docker 18.01.0-ce (TCL 8.2.1); HEAD : 0bb7bbd - Thu Jan 11 16:32:39 UTC 2018"
ANSI_COLOR="1;34"
HOME_URL="http://boot2docker.io"
SUPPORT_URL="https://github.com/boot2docker/boot2docker"
BUG_REPORT_URL="https://github.com/boot2docker/boot2docker/issues"

Udemy の Learning Docker and Kubernetes by Lab がとてもよい

Docker 再入門として Learning Docker and Kubernetes by Lab | Udemy のコースを受講しているのだが、とてもよい。コンテナを支える Linux カーネルの機能として cgroups, Network Namespaces (Strorage(aufs), Security, Process Namespaces) の概要から、brctl, ip netns の使用例と仕組みまで解説してくれていて、とてもわかりやすい。(^.^)

今まで読んだ Docker 本ではコンテナを支える Linux カーネルの機能を説明しているものがなかったし、当然 brctl や ip netns も出てくることはなかった。O'Reilly の Docker 本は python のアプリを使って説明しようとしていたが、「知りたいのは docker であって pythonフレームワークじゃないんだよ... コンテナなんか素の nginx で十分(docker -d --name my-nginx-1 nginx) なんだよ... 」と言いたい気持ちをぐっとこらえて読んだものの、どこかはぐらかされた気持ちで消化不良を起こしていた。

コースの内容はドキュメントにまとまって公開されている。これを読むだけでもわかる人にはわかるのだろうが、自分の場合は、実際にビデオをみて、手を動かして、ドキュメントで補足するのが一番理解が進んだ。

Docker Kubernetes Lab Handbook — Docker Kubernetes Lab 0.1 documentation

個人的にありがたかった点を以下にあげておく。

  • コンテナの基礎技術である cgroups の説明により k8s の CPU 割り当ての実態が見えてくる。
  • brctl と ip netns の説明により docker の Network Namespaces の実態が見える。実際、docker は自身の Network Namespace を隠してしまうため ip netns list では表示されないが、それを裏技的に表示する方法を紹介している。ip netns exec が実際の docker exec なのではないかと思う(大きく外れてはいないはず)。
  • CNM や overlay ドライバを利用した複数ホストをまたいだネットワークがよくわかる。docker 本家でもこれらの例をわかりやすい図で説明してくれているのだが、学習者はなかなかそのリンクまでたどり着かないことが多いと思う。(⌍་д་⌌)

libnetwork/design.md at master · docker/libnetwork · GitHub

labs/06-overlay-networks.md at master · docker/labs · GitHub

better-files を使用して複数ファイルの一括処理を書き直す

会社の Scala エキスパートから、better-fs, fs2 というライブラリを教えていただいたので書き直してみる。とても短くなりました。(^q^)。

GitHub - pathikrit/better-files: Simple, safe and intuitive Scala I/O

ayakumo.hatenablog.com

@ import better.files._; import java.io.{File => JFile}
import better.files._;
import java.io.{File => JFile}

@ File("/tmp").glob("*.txt").foreach { file => file.lines.filter(_.contains("a")).foreach(println) }
cat
apple
banana

何にでも言えることだと思うけど初学者は知識も視野も狭いので、いわゆる「デファクトスタンダード」的な便利な非標準ライブラリまでたどり着かないことが多い。こういった面でメンターとなる方が側にいると大変ありがたい。(´ω`)

読み解き PiS3: Higher Order Functions を使って複数ファイルの一括処理を行う

9.4 WRITING NEW CONTROL STRUCTURES を読んでいて、複数ファイルに対して「ファイルを開いて特定の処理を行う」ことができるはずと思って実装した。Scala でメソッドをメソッドの引数に取るのは HOF(Higher Order Functions) というらしい。 C でいう関数ポインタがさらに高度になったようなイメージを持っている。

「ファイル名を受け取って、開く」までは共通だけれども、開いたファイルに対して実行したいことが異なる場合は 3 番目のメソッドだけ入れ替えればいいので柔軟性に富む。左から右に処理が書かれているのもわかりやすいかもしれない。⊂( ・∀・) 彡

$ cat /tmp/fruits.txt
apple
banana

$ cat /tmp/animals.txt
cat
dog
@ import scala.io.Source
import scala.io.Source

@ val files = List("/tmp/fruits.txt", "/tmp/animals.txt")
files: List[String] = List("/tmp/fruits.txt", "/tmp/animals.txt")

@ val getFileContents = (path: String) => Source.fromFile(path).getLines
getFileContents: String => Iterator[String] = ammonite.$sess.cmd2$$$Lambda$2031/1972193961@11a67420

@ def crunchFiles(paths: List[String], f1: String => Iterator[String], f2: String => Unit): Unit = paths.foreach { path => f1(path).foreach { line => f2(line) } }
defined function crunchFiles

@ def printWithIndent(line: String) = println(s"    $line")
defined function printWithIndent

@ crunchFiles(files, getFileContents, printWithIndent)
    apple
    banana
    cat
    dog

@ def printIfWordContainsCharA(line: String) = if (line.contains("a")) println(line)
defined function printIfWordContainsCharA

@ crunchFiles(files, getFileContents, printIfWordContainsCharA)
apple
banana
cat

@ import java.io.File
import java.io.File

@ new File("/tmp").listFiles.filter(_.toString.endsWith("txt"))
res23: Array[File] = Array(/tmp/animals.txt, /tmp/fruits.txt)

@ def crunchFiles(files: Iterator[String], f1: String => Iterator[String], f2: String => Unit): Unit = files.foreach { path => f1(path).foreach { line => f2(line) } }
defined function crunchFiles

@ val listTextFilesUnderDirectory = (dir: String) => new File(dir).listFiles.filter(_.toString.endsWith("txt")).toList.map(_.toString).toIterator
listTextFilesUnderDirectory: String => Iterator[String] = ammonite.$sess.cmd41$$$Lambda$2447/934433293@4f559d04

@ crunchFiles(listTextFilesUnderDirectory("/tmp"), getFileContents, printIfWordContainsCharA)
cat
apple
banana

@
def crunchFiles(dir: String, f0: String => Iterator[String], f1: String => Iterator[String], f2: String => Unit): Unit = f0(dir).foreach { path => f1(path).foreach { line => f2(line) } }
defined function crunchFiles

@ crunchFiles("/tmp", listTextFilesUnderDirectory, getFileContents, printIfWordContainsCharA)
cat
apple
banana

Ammonite ではじめるすくすく Scala 生活

だいたい Ammonite に書いてある。Magic Imports はとてもありがたい。

インストール

$ sudo curl -L -o /usr/local/bin/amm https://git.io/vdNv2 && sudo chmod +x /usr/local/bin/amm && amm

REPL として使う

$ amm
(... snip the greeting message ...)

@  "This is Ammonite REPL".split(" ").foreach(println)
This
is
Ammonite
REPL

REPL として使う + 外部ライブラリを追加する

$ amm
(... snip the greeting message ...)

@ import $ivy.`com.github.nscala-time::nscala-time:2.18.0`, com.github.nscala_time.time.Imports._
import $ivy.$                                           , com.github.nscala_time.time.Imports._

@ DateTime.now().toMutableDateTimeISO
res14: org.joda.time.MutableDateTime = 2018-01-18T20:53:19.347+09:00

REPL として使う + 外部ライブラリを起動時に読み込ませるように設定しておく

$ vi ~/.ammonite/predef.sc
import $ivy.`org.scalaz::scalaz-core:7.2.7`, scalaz._, Scalaz._
import $ivy.`com.github.nscala-time::nscala-time:2.18.0`, com.github.nscala_time.time.Imports._
$ amm
(... snip the greeting message ...)

@ (1.hour + 2.minutes + 34.seconds).getClass
res9: Class[T] = class com.github.nscala_time.time.DurationBuilder

コマンドとして使う(-c)

$ amm -c 'import scala.io.Source; val f = Source.fromFile("/home/kyagi/.gitconfig"); for(l <- f.getLines) { if(l.contains("checkout")) println(l); }'
Compiling /home/kyagi/bin/(console)
  cb = checkout -b
  co = checkout
  tg = "!f() { git checkout -b "$1" "refs/tags/$1"; }; f"
  yo = "!f() { git checkout -b "$1" "origin/$1"; }; f"
  yp = "!f() { git checkout -b "$2" "$1/$2"; }; f"

スクリプトを実行するインタプリンタとして使う (-s はサイレントオプション)

import scala.io.Source
import ammonite.ops._

@main
def main(str: String, path: Path): Unit = {
  val file = Source.fromFile(path.toString)
  for (line <- file.getLines) {
    if (line.contains(str)) println(line)
  }
}
$ amm -s MyGrep.sc branch /home/kyagi/.gitconfig
Compiling /home/kyagi/bin/MyGrep.sc
    ba = branch -ra
    bd = branch -d
    bD = branch -D
    br = branch
    bv = branch -vv

スクリプトを実行するインタプリンタとして使う + 別窓でスクリプトを修正したら自動実行

$ amm -s -w MyHello.sc
hello, wolrd
Watching for changes to 2 files... (Ctrl-C to exit) # 別窓で vi MyHello.sc して s/world/scala/ する
hello, scala
Watching for changes to 2 files... (Ctrl-C to exit)
...

-w オプションは sbt の ~run に相当する(Ruby でいう Guard)。٩(๑´3`๑)۶

Ammonite を使用してお手軽に Scala のスクリプトを書く

sbt は優秀なツールだけれども、さくっと Scalaスクリプトを書くには Ammonite のほうがお気に入り。シェルからは -c オプションで気軽に Scalaスクリプトとして実行可能。

$ amm -c 'import scala.io.Source; val file = Source.fromFile("/home/kyagi/.gitconfig"); file.getLines.foreach(line => { if (line.contains("branch")) println(line) })'
Compiling /home/kyagi/(console)
    ba = branch -ra
    bd = branch -d
    bD = branch -D
    br = branch
    bv = branch -vv

スクリプトをファイルに落として起きたい時は @main というアンモナイト記法? の後に main function を書く。

showGitBranchAlias.sc

import scala.io.Source

@main
def main(): Unit = {
  val file = Source.fromFile("/home/kyagi/.gitconfig")
  file.getLines.foreach(line => {
    if (line.contains("branch")) println(line)
    }
  )
}
$ amm showGitBranchAlias.sc
Compiling /home/kyagi/bin/showGitBranchAlias.sc
    ba = branch -ra
    bd = branch -d
    bD = branch -D
    br = branch
    bv = branch -vv

もちろん REPL としても使える。sbt console よりも早く立ち上がる。プロンプトが @ なのがアンモナイトの名前の由来? ぽい (^.^;

シングルトンオブジェクトを IntelliJ の Scala Worksheet で確認する

Singleton objects are sort of a shorthand for defining a single-use class, which can’t directly be instantiated, and a val member at the point of definition of the object, with the same name. Indeed, like vals, singleton objects can be defined as members of a trait or class, though this is atypical. (TOUR OF SCALA, SINGLETON OBJECTS)

シングルトンオブジェクトは1回しか使われないクラスを便利に定義するための省略表現のようなものである。シングルトンオブジェクトはインスタンス化できない。object キーワードで定義した時点でシングルトンオブジェクトはクラス定義と同時にクラスと同じ名前の val (代入不可) メンバを生成する。変則的な使い方としては、シングルトンオブジェクトは trait や class のメンバとしても利用できる。

Singleton Objects | Scala Documentation

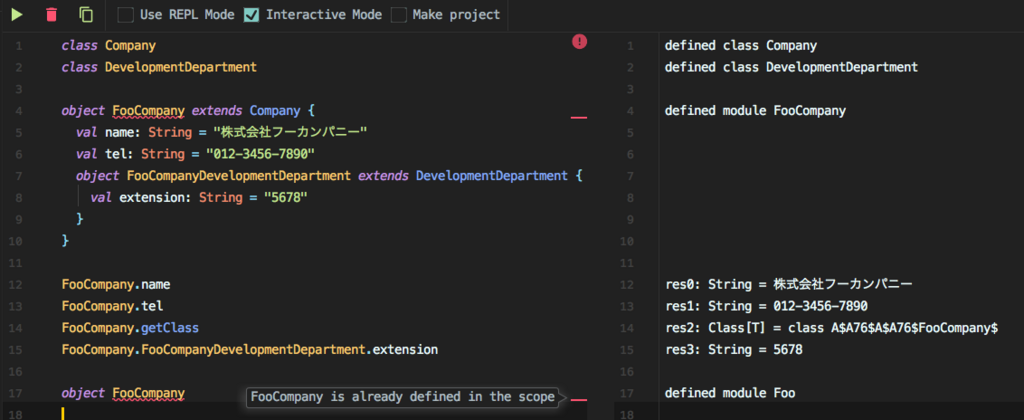
IntelliJ の Scala Worksheet を使って class 定義を継承した object を作ってみた例。object と同じ名前の FooCompany というクラスが同時に定義されているのが getClass から確認できる。

f:id:kyagi:20180116235057p:plain

「シングルトン」の名前の通り、同じ名前のオブジェクトを二回定義することはできない。

f:id:kyagi:20180116235424p:plain

Safari Books Online で他の Scala 本を読んでいると以下のような説明も見つかった。

The object keyword creates a new singleton type, which is like a class that only has a single named instance. (Chapter2 2. Getting started with functional programming in Scala, Functional Programming in Scala)

シングルトンオブジェクトとはインスタンスを一つしか持たないクラスのようなものである。

個人的に PiS3 は読み物として少し難しく感じるため、Safari Books Online で他の Scala 本を理解の補足として読むのが習慣になっている。Funnctional Programming in Scala, Scala for the Impatinet, Pragmatic Scala を並行して読んでいる。(。・ω・。)

読み解き PiS3: ケースシーケンスの実体は関数リテラルである

A sequence of cases (i.e., alternatives) in curly braces can be used anywhere a function literal can be used.Essentially, a case sequence is a function literal, only more general. Instead of having a single entry point and list of parameters, a case sequence has multiple entry points, each withtheir own list of parameters. Each case is an entry point tothe function, and the parameters are specified with the pattern. Thebody of each entry point is the right-hand side of the case. (Chapter 15. Case Classes and Pattern Matching)

  • 偶数判定の関数リテラル(function literals) を作ってみる。Lambda が返っているので無名関数と言ってもよいのかなと思う(Lisp 好きな私には lambda は懐かしい)
scala> val isEven = (x: Int) => { if((x % 2) == 0) true else false }
isEven: Int => Boolean = $$Lambda$3888/394887728@36f14bca

scala> isEven(3)
res10: Boolean = false

scala> isEven(4)
res11: Boolean = true
  • もうちょっと短くしてこれでも大丈夫だった。
scala> val isEven = (x: Int) => (x % 2) == 0
isEven: Int => Boolean = $$Lambda$4044/817940743@616ae52
  • ケースシーケンス中に関数リテラルを埋め込んでみる。
scala> val isEven: Int => Boolean = {
     |   case x: Int => (x % 2) == 0
     | }
isEven: Int => Boolean = $$Lambda$4043/1380981831@d5d3ee

scala> isEven(10)
res49: Boolean = true

scala> isEven(11)
res50: Boolean = false
  • ケースシーケンスを val にひもづかせる時の値としての関数(function values)の書き方は少し特殊だが以下のようだ。PiS3 に説明の記述が見当たらなかった。|ω・)
val variable_name: argument_type => return_type = { ... body ... }